
17 juin 2026 / Bastian Werner
The August 12, 2026 Total Solar Eclipse: A Photographer's Guide
The August 12, 2026 Total Solar Eclipse: A Photographer's Guide
There are events that, as a landscape and weather photographer, you wait a lifetime for. The total solar eclipse on Wednesday, August 12, 2026, is exactly such a moment. For the first time since August 11, 1999, the Moon’s umbral shadow will once again cross mainland Europe—and it will do so right in the middle of the summer holiday season. Those fortunate enough to stand within the path of totality under clear skies will witness an experience that is almost impossible to put into words. Those who miss it in Germany will have to wait until 2081 for the next total solar eclipse visible from their own country.
In this article, I share how I approach this extraordinary event as a weather photographer: not with a rigid plan, but with the willingness to chase clear skies wherever they may be. I also explain how the three focal length ranges — the Tamron 16–30mm F/2.8, the Tamron 70–180mm F/2.8, and the Tamron 150–500mm — can each be used effectively for different photographic concepts, whether you are observing the eclipse from Spain or from Germany.

The Sequence of Events: What Will Actually Happen on August 12, 2026
The Moon’s shadow begins its journey far to the north, sweeping across Siberia, the Arctic near the North Pole, and the Greenland Ice Sheet. In the late afternoon (Central European time), the umbral shadow reaches the west coast of Iceland, where the Sun still stands about 25° above the horizon. It sounds tempting—but I have nevertheless crossed Iceland off my list. Statistically, August is a cloudy month there, and the chances of finding a gap in the clouds during those precious two minutes are simply too low for my liking. You do not photograph a solar eclipse under the sky you wish for, but under the sky you get.
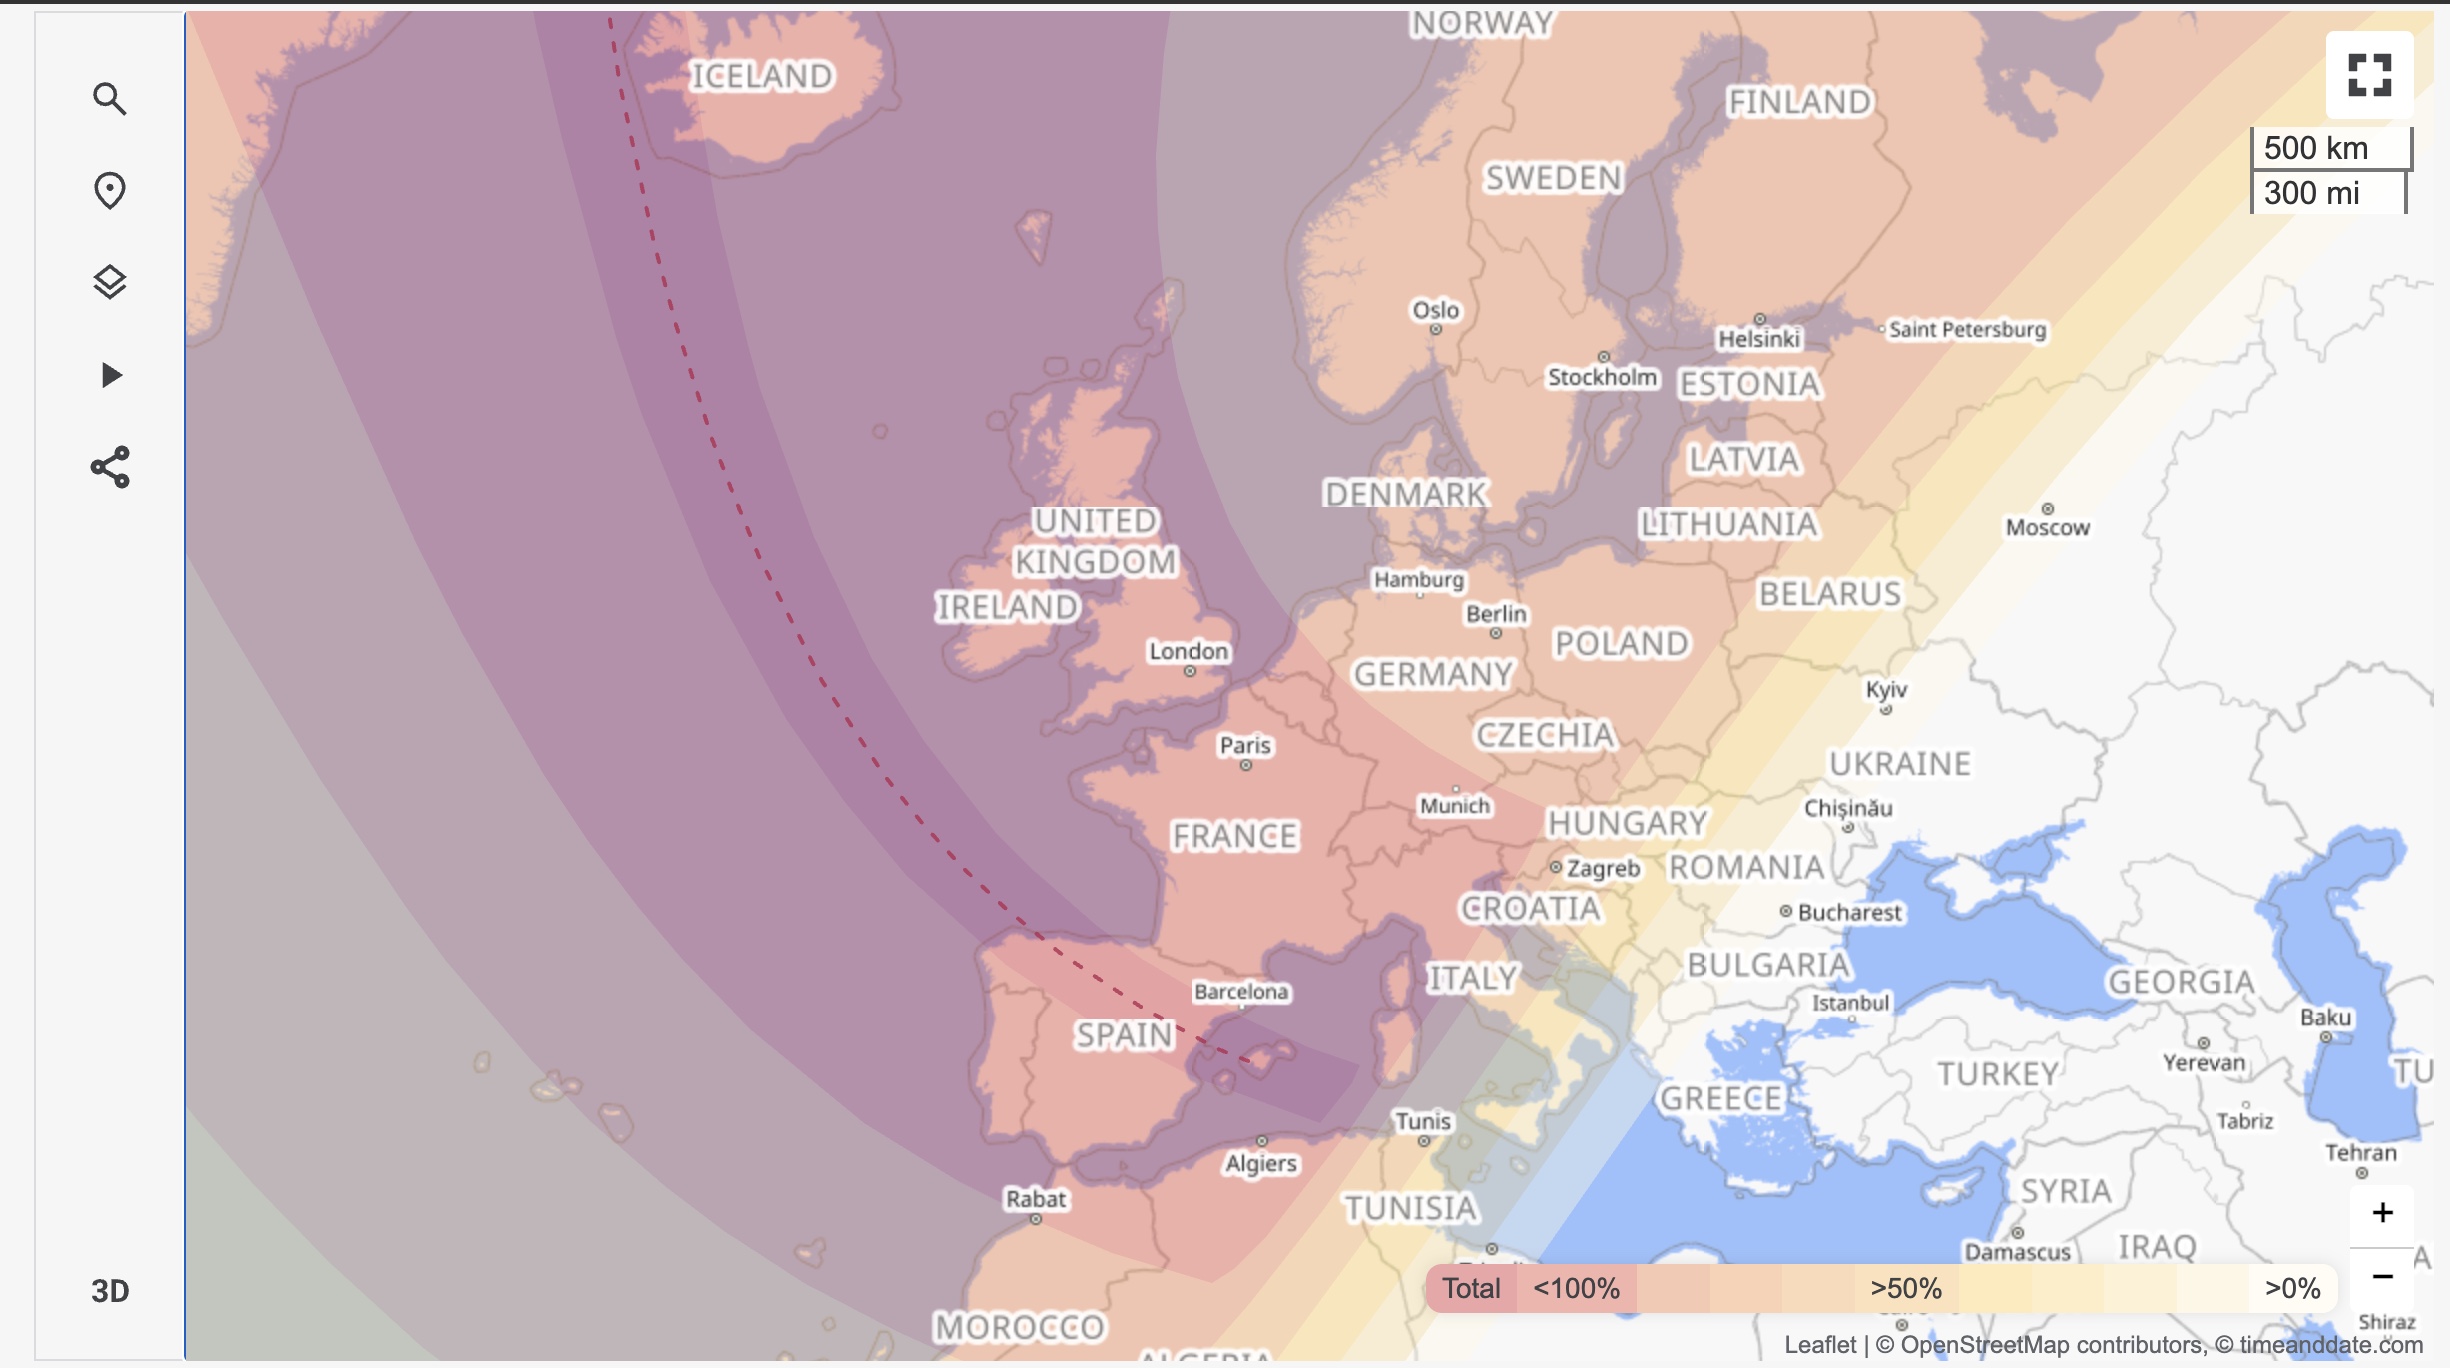
The shadow then crosses the Atlantic before reaching northern Spain in the evening. The path of totality stretches in a broad band from Galicia in the northwest across the Iberian Peninsula to the Balearic Islands, with totality occurring between approximately 20:26 and 20:32 CEST. This is where the photographic opportunity of the year awaits.
For Germany, however, there is one important—and often misunderstood—fact: there will be no total eclipse. Germany lies within the Moon’s penumbra and will experience “only” a very deep partial eclipse. The Moon will cover a large portion of the Sun’s disk, but the defining moment—when the solar corona suddenly appears and daylight briefly turns to night—will remain south of the Pyrenees. That changes the entire photographic approach, as we will see later.
Location Selection in Spain: Center of Totality, Clear View to the Northwest
In Spain, the rule is simple: the closer you are to the centerline, the longer the totality. At the edge of the path, you only get a few seconds; on the centerline, it’s around 1 minute 45 seconds (about 1:45 in León, roughly 1:40 in Soria). Every second counts, so I plan my location as centrally as possible.
Three factors decide between success and frustration:
Book accommodation early. We are talking about Europe’s major astronomical event. Hotels, fincas, and campsites along the path of totality have been partially booked out for months. If you still don’t have a base, you should reserve immediately—ideally somewhere central within the path, allowing flexibility to move in multiple directions.
Start driving early. Eclipse tourism will flood entire regions. Expect congested rural roads, full parking lots, and slow traffic on the afternoon of August 12. My advice: be in the general target area by late morning so you can cover the final kilometers without stress.
Pay attention to the low Sun. This is another special aspect of this eclipse. In Spain, the Sun will be very low during totality—depending on location, only about 8 to 12 degrees above the horizon. This has two consequences. First: the light is breathtaking. The corona is seen through much more atmosphere than at midday and can take on a golden-red hue—a “golden corona” that you don’t get with high-Sun eclipses. Second, and more critical: even the smallest hill, tree line, or building ridge toward the west or northwest can block the Sun at exactly the wrong moment.
This directly determines terrain choice: I look for slightly elevated ground with an entirely unobstructed view to the northwest. I avoid narrow valleys, where the low Sun disappears behind slopes long before totality begins. Instead, I prefer the central Spanish plateau (the Meseta): vast, flat highlands with a low horizon and excellent chances of clear skies in August. I deliberately stay away from the northern coast—tempting as the sea might be as a foreground, the cloud probability there is simply too high.
On Eclipse Day: Reading the Weather
And this is where the real job of a weather photographer begins. A fixed location is a bet—mobility is a strategy. On August 12, I monitor cloud development from early morning and remain ready to drive hundreds of kilometers if necessary.
Two tools form the backbone of my approach:
With the VIEWFINDR app, I don’t just check cloud cover at my location, but three-dimensionally across the entire region. The app models clouds at different altitudes and even accounts for what sits low on the horizon—exactly where the Sun will be. This allows me to identify clear-sky corridors within reach and move there in time, rather than ending up under a cloud at my chosen spot.
With the ShadowMap website, I then analyze the terrain. ShadowMap visualizes sun position and terrain shadows on a 3D model of the landscape. I input the date and time of totality and can immediately see whether a ridge, forest line, or building will block the low Sun—or whether my location truly has an unobstructed horizon. The combination of both tools—clear skies via VIEWFINDR and open horizons via ShadowMap—is already half the battle.
Location Selection in Germany: The Deep Partial Eclipse
In Germany, the rule is clear: the farther south (more precisely, southwest) you are, the more of the Sun will be covered. In the southwest and toward the Alps, coverage reaches around 89%, in Munich about 90%, and in Valais even up to 92%. In the northeast—on Rügen, for example—it is “only” around 84%. Spectacular everywhere.
Even here, the Sun will be very low at maximum eclipse—locally only about 2 to 4 degrees above the horizon. In some parts of southern Germany and Austria, the eclipsed Sun will even set while the eclipse is still in progress.
This leads to the same location rule as in Spain: choose an elevated viewpoint with a completely unobstructed view toward the west to northwest—no hills, no house lines, no forest edges in the line of sight. Tools like VIEWFINDR and ShadowMap serve the same purpose here.
The darkened, very low Sun above a carefully chosen foreground just before sunset—that is the defining German composition for this event.
Focal Lengths and Image Ideas: Three Lenses, Three Roles
Now to the most exciting part—what focal length for which image? The answer depends crucially on whether you are in Spain (totality) or in Germany (partial eclipse).
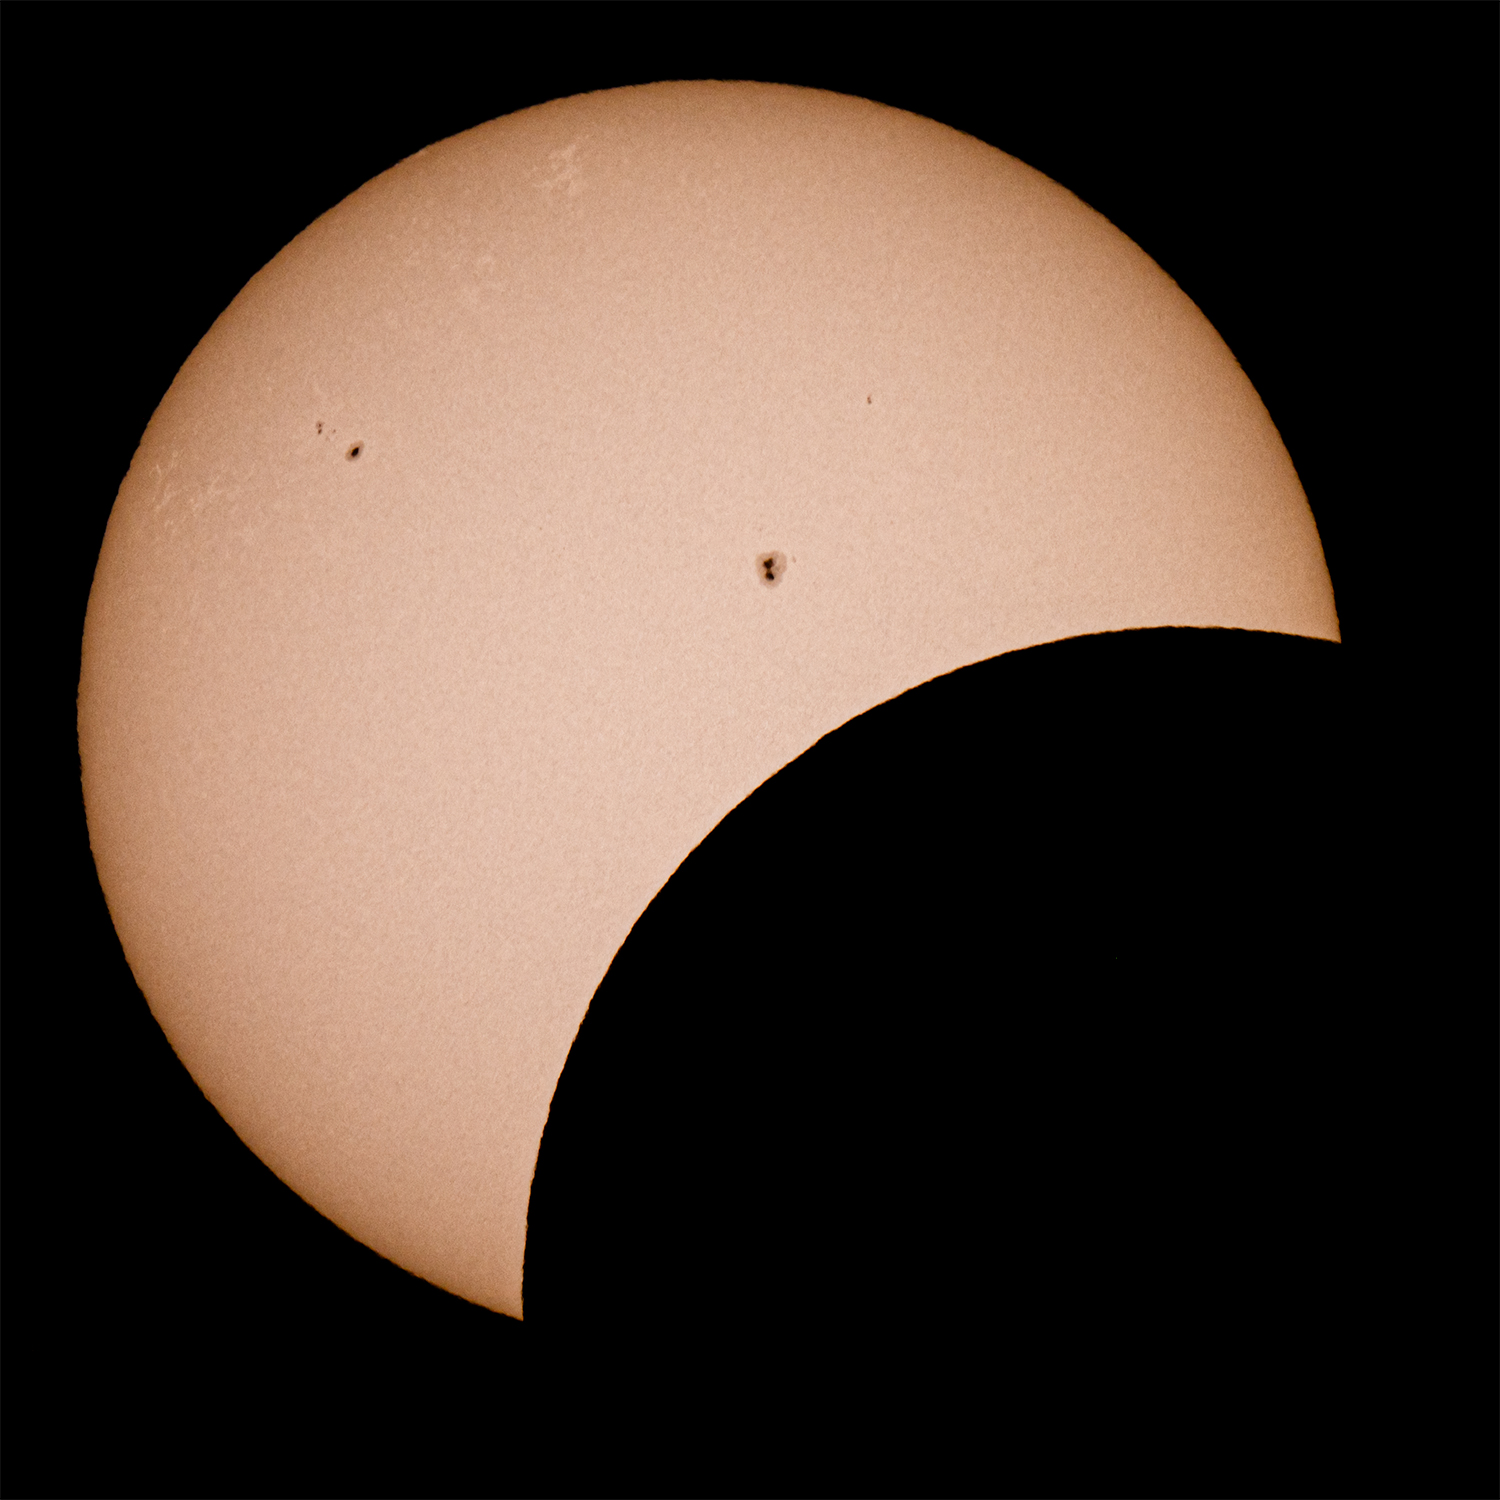
In Germany, essentially only the Tamron 150-500mm F/5-6.7 Di III VC VXD is truly relevant. Without totality there is no corona, no prominences, no diamond ring—meaning no wide-angle “nightfall moment” either. What remains is detail: the increasingly thin, sunspot-speckled crescent Sun, filling the frame and rendered in sharp definition. For this, the long focal length is the tool of choice.
In Spain, by contrast, all three lenses come into play—used in sequence, each with a clearly defined role.
16–30 mm F/2.8 – the atmosphere of totality
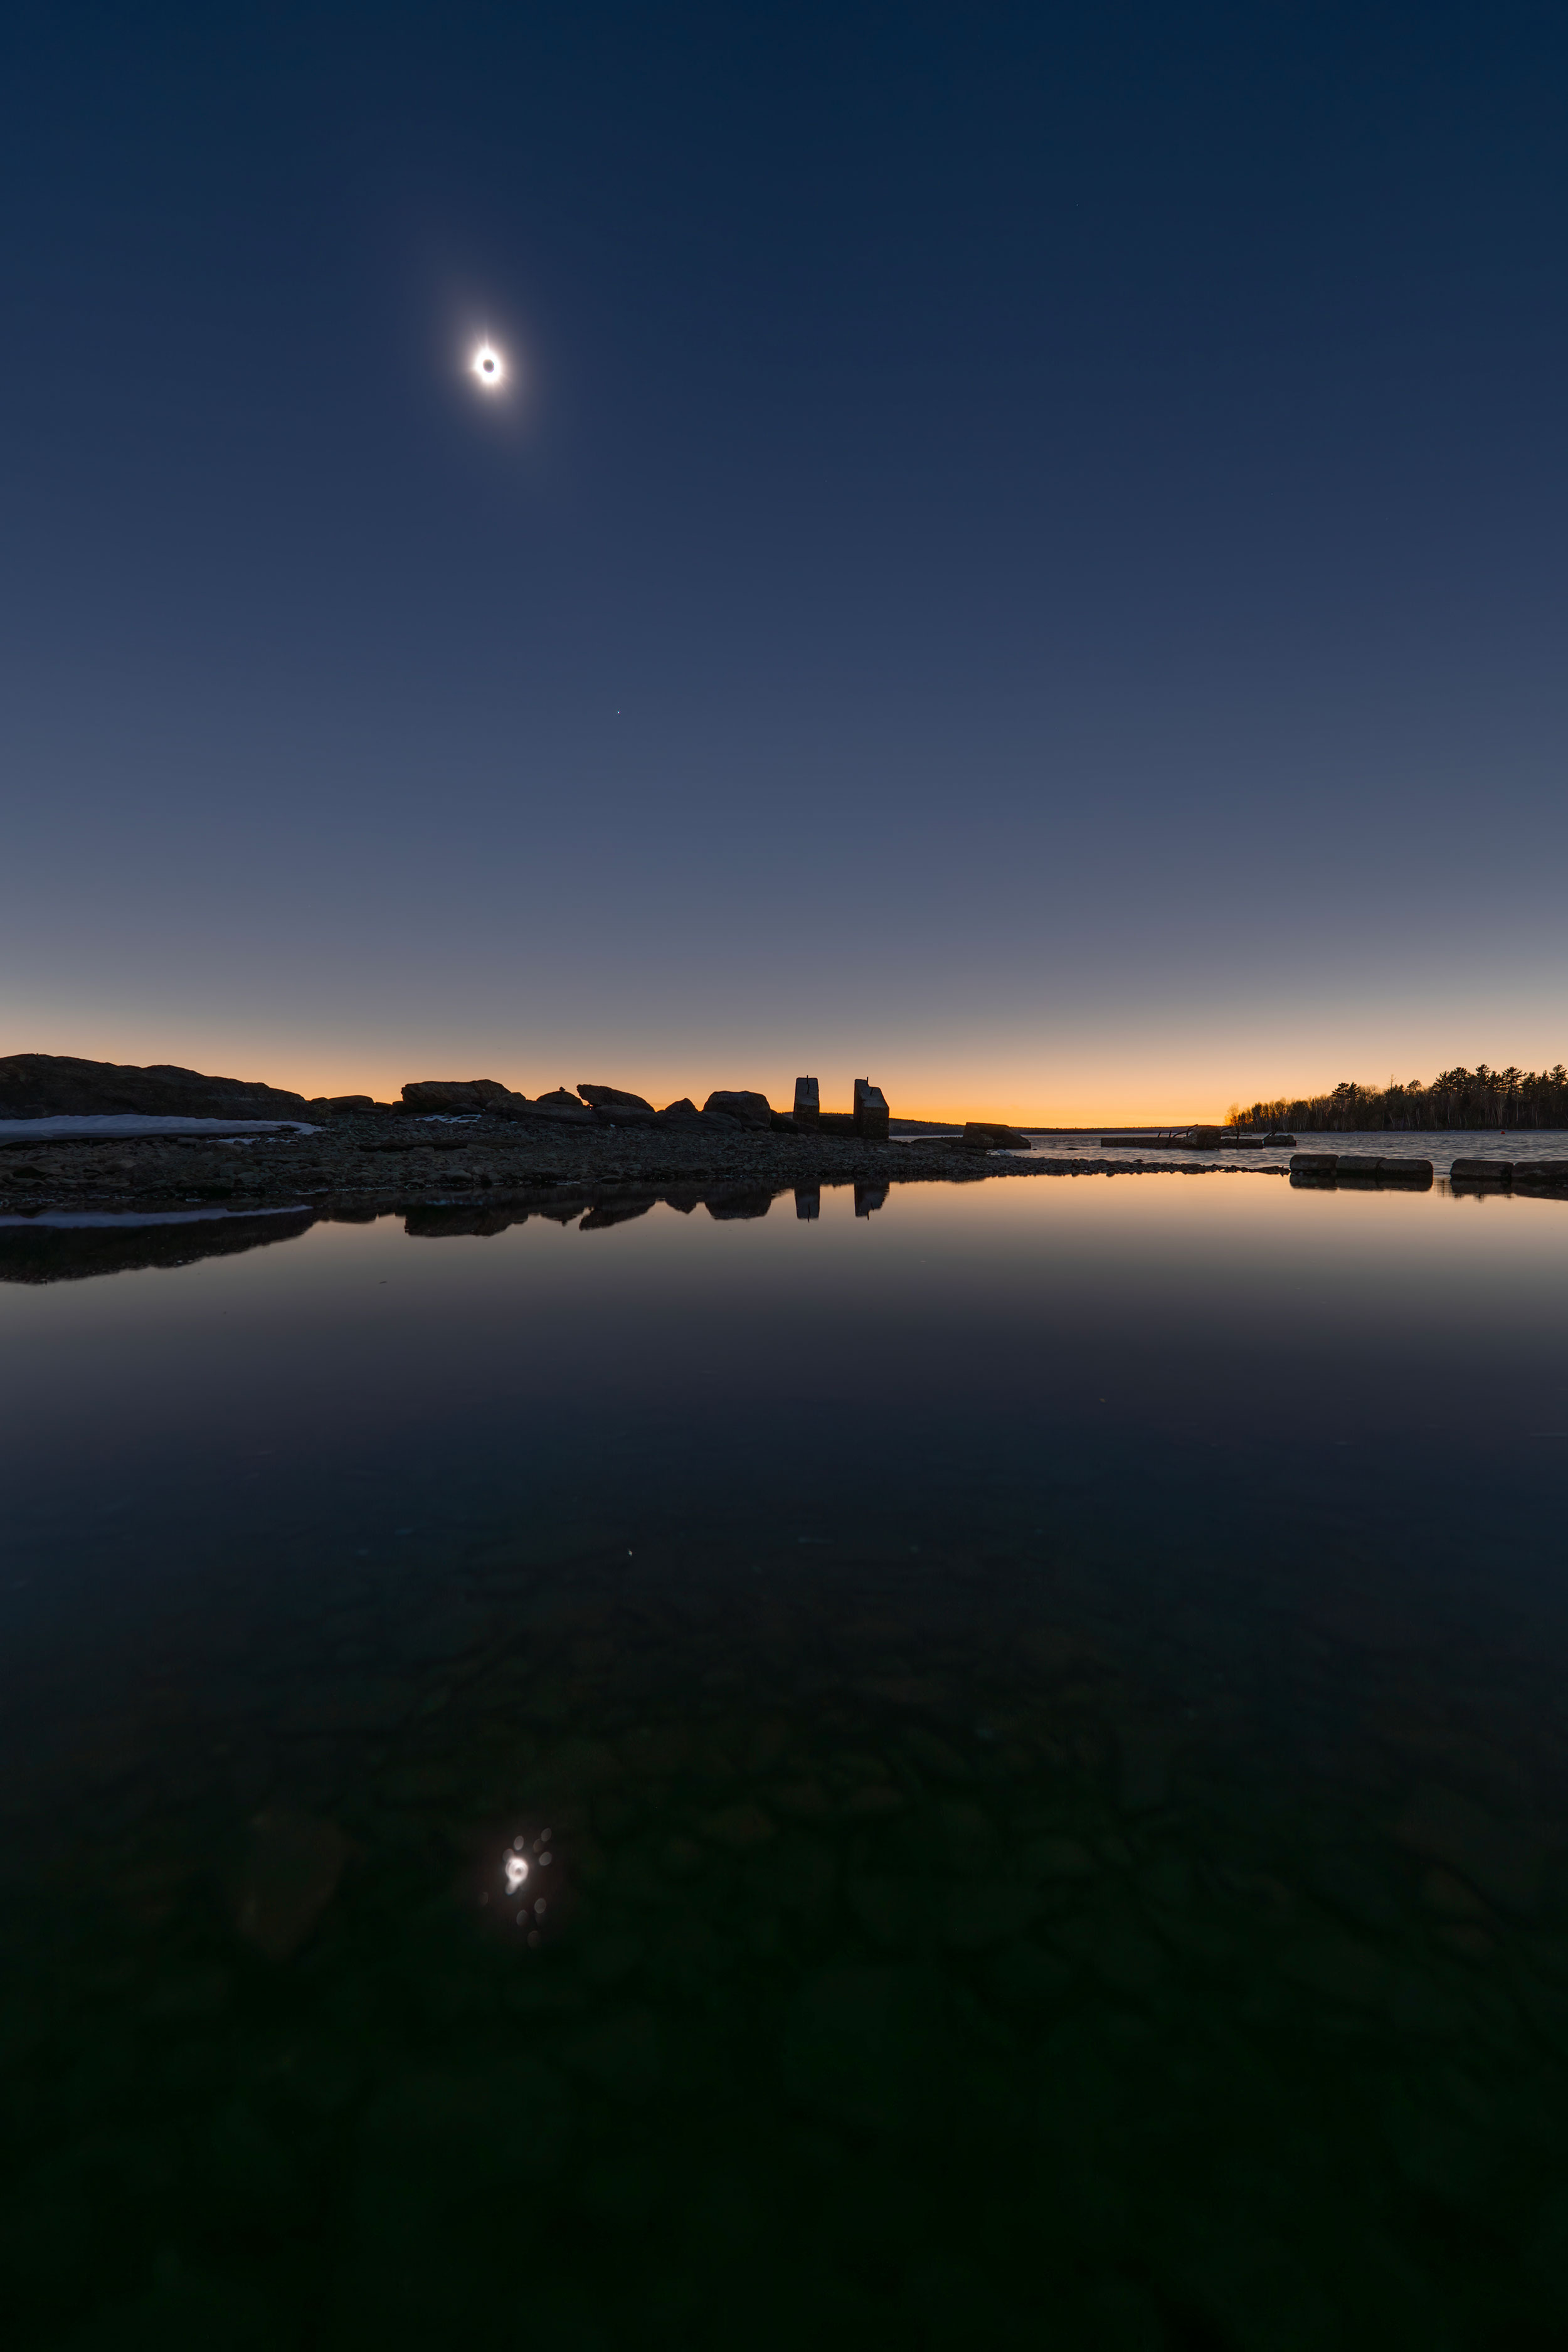
When the shadow arrives, far more happens than what a telephoto lens can capture. The entire horizon glows in twilight colors, the landscape fades into muted light, and planets and bright stars become visible. This full experience can only be captured with a wide-angle lens.
With the Tamron 16-30mm F/2.8 Di III VXD, I place the small Sun—surrounded by the solar corona—into a vast sky, including landscape, horizon glow, and possibly a reflective water surface in the frame. The fast F/2.8 aperture helps maintain relatively short exposure times in the fading light.
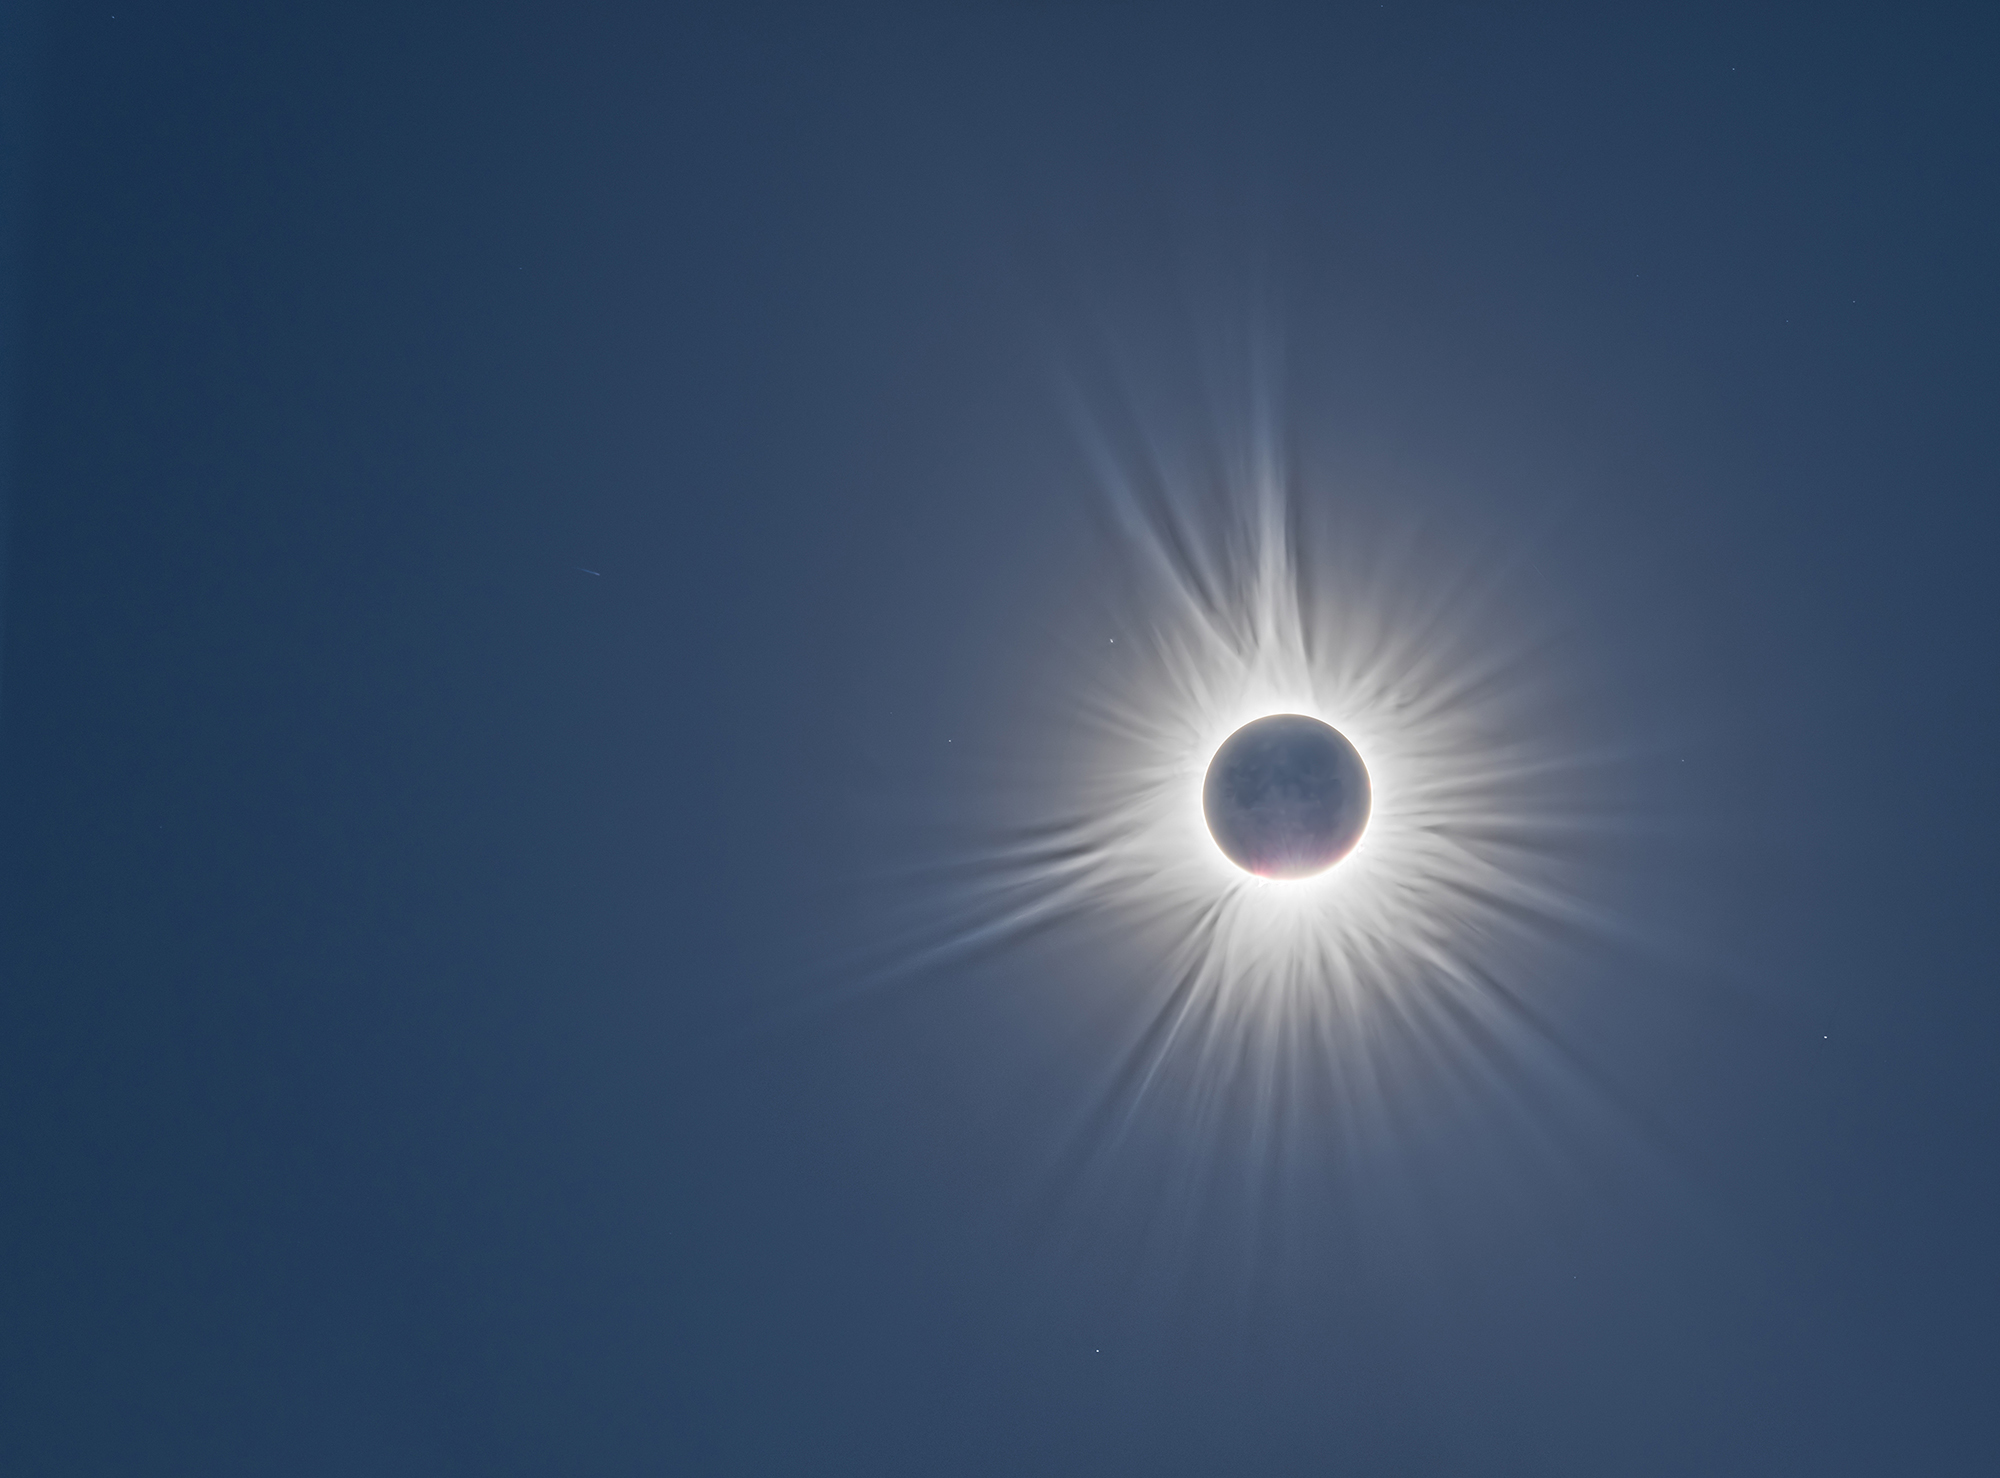
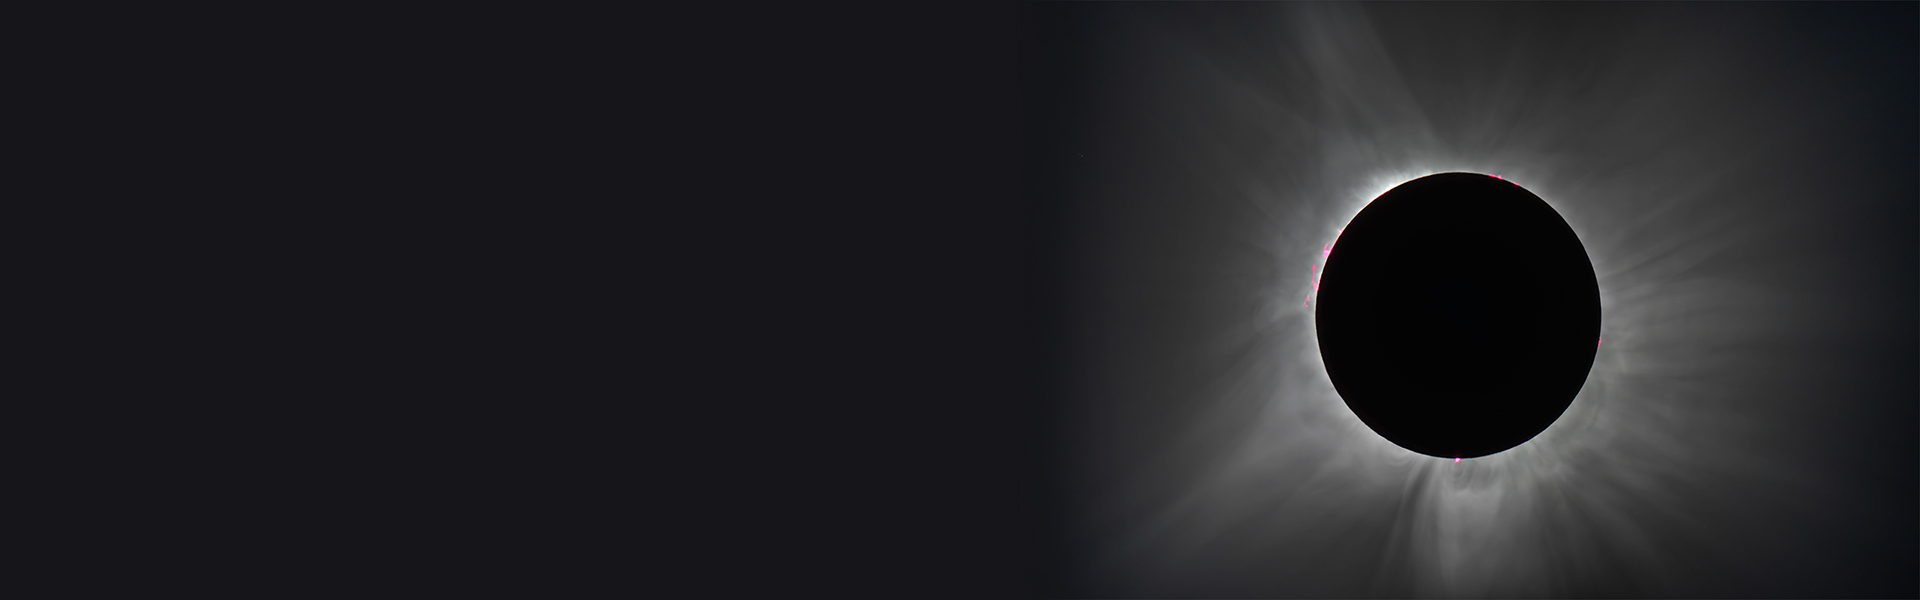
70–180 mm F/2.8 – the Corona
Around the 180–200 mm range lies the sweet spot for capturing the solar corona. The Sun’s outer atmosphere extends with its fine rays several solar diameters into space—using a longer telephoto lens would already start to crop this structure.
With the Tamron 70-180mm F/2.8 Di III VXD, I can render the corona in its entirety, including the delicate streamers that extend outward from the edge of the lunar disk. The constant F/2.8 aperture is a real advantage here, as it allows for short exposure times during the dark phase of totality.
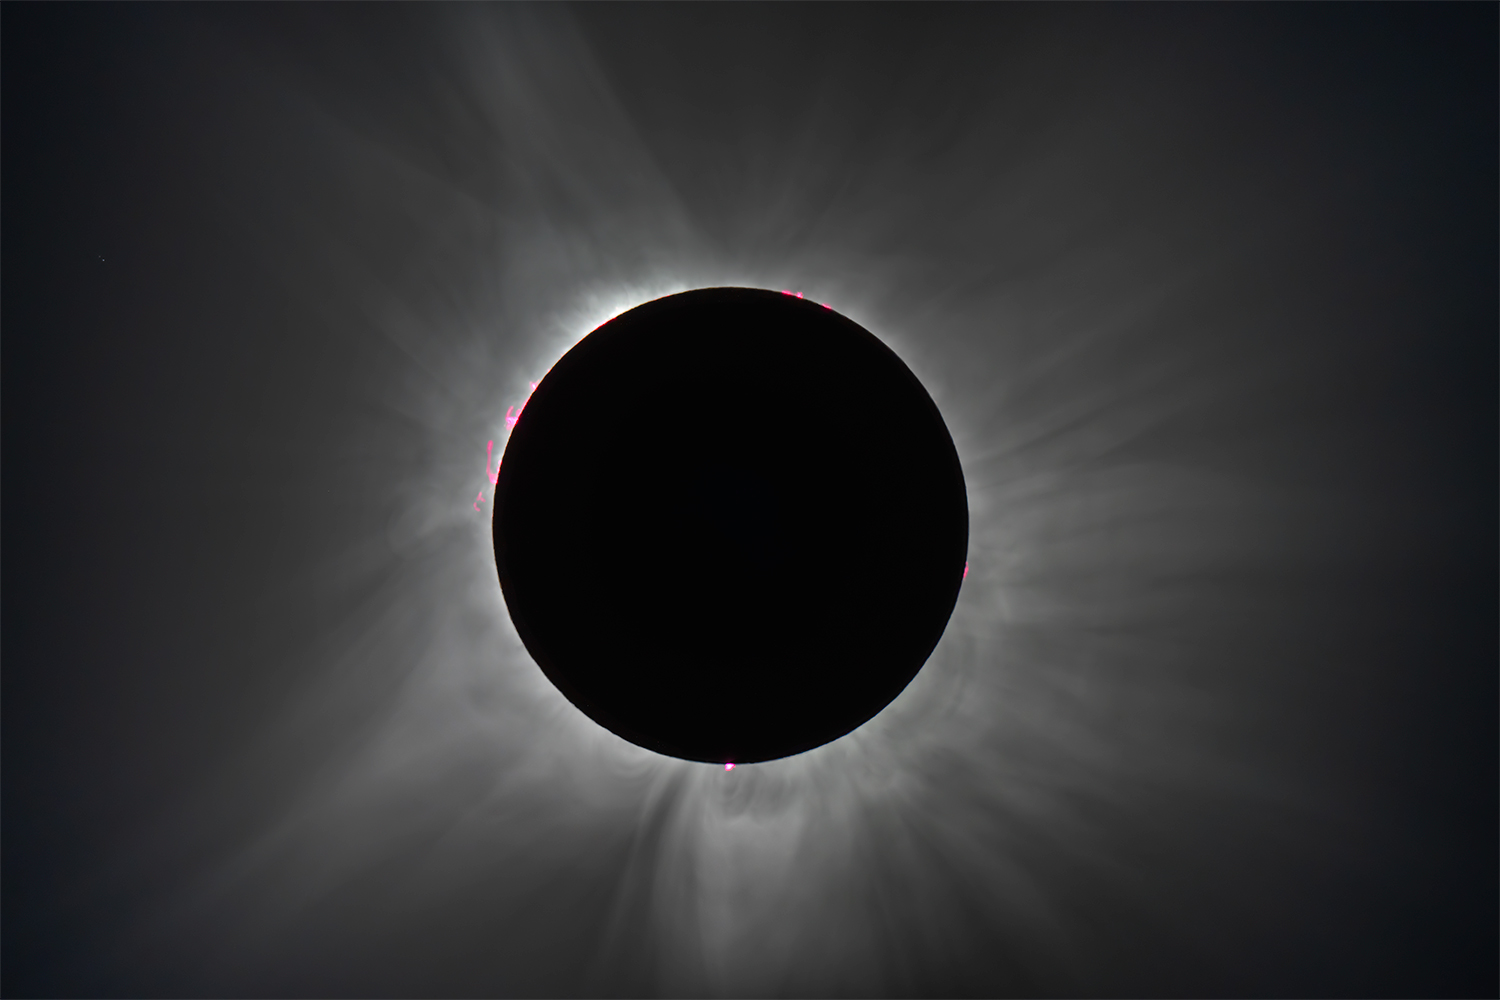
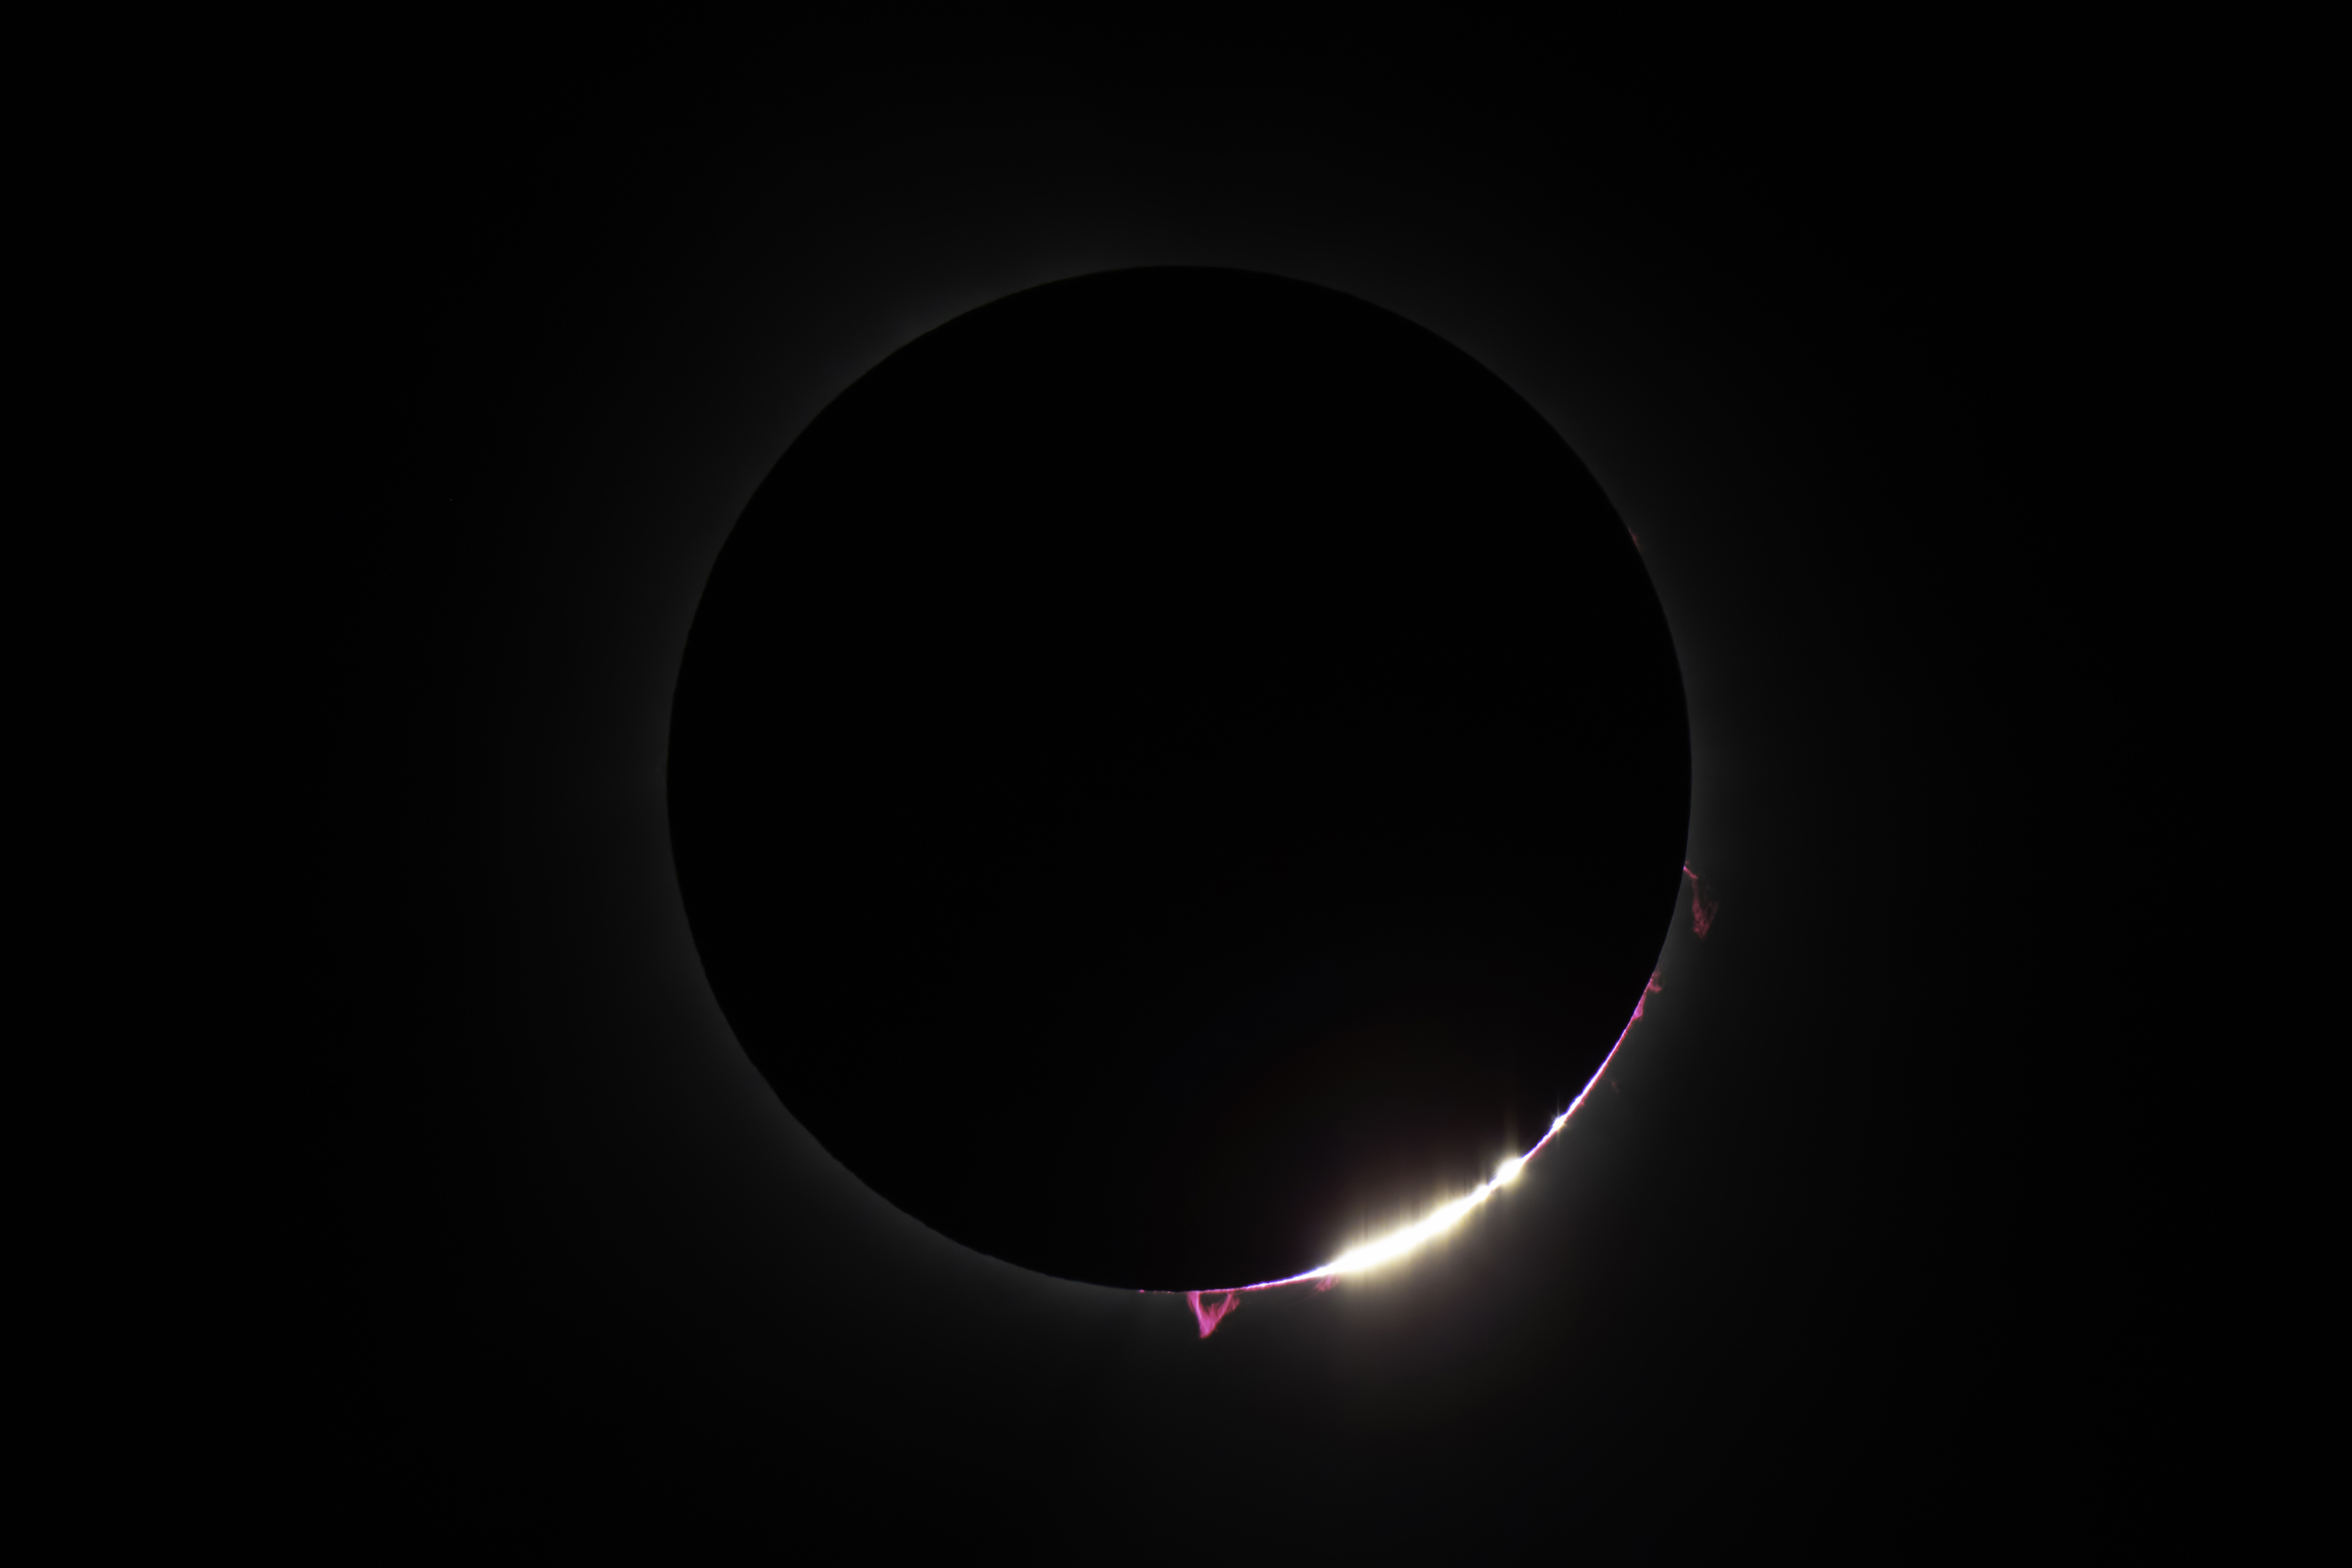
150–500 mm – Prominences and the Diamond Ring
For the finest details, I switch to the Tamron 150-500mm F/5-6.7 Di III VC VXD. This is where solar prominences become visible—those pinkish-red arcs of glowing gas that rise from the Sun’s chromosphere along its edge.
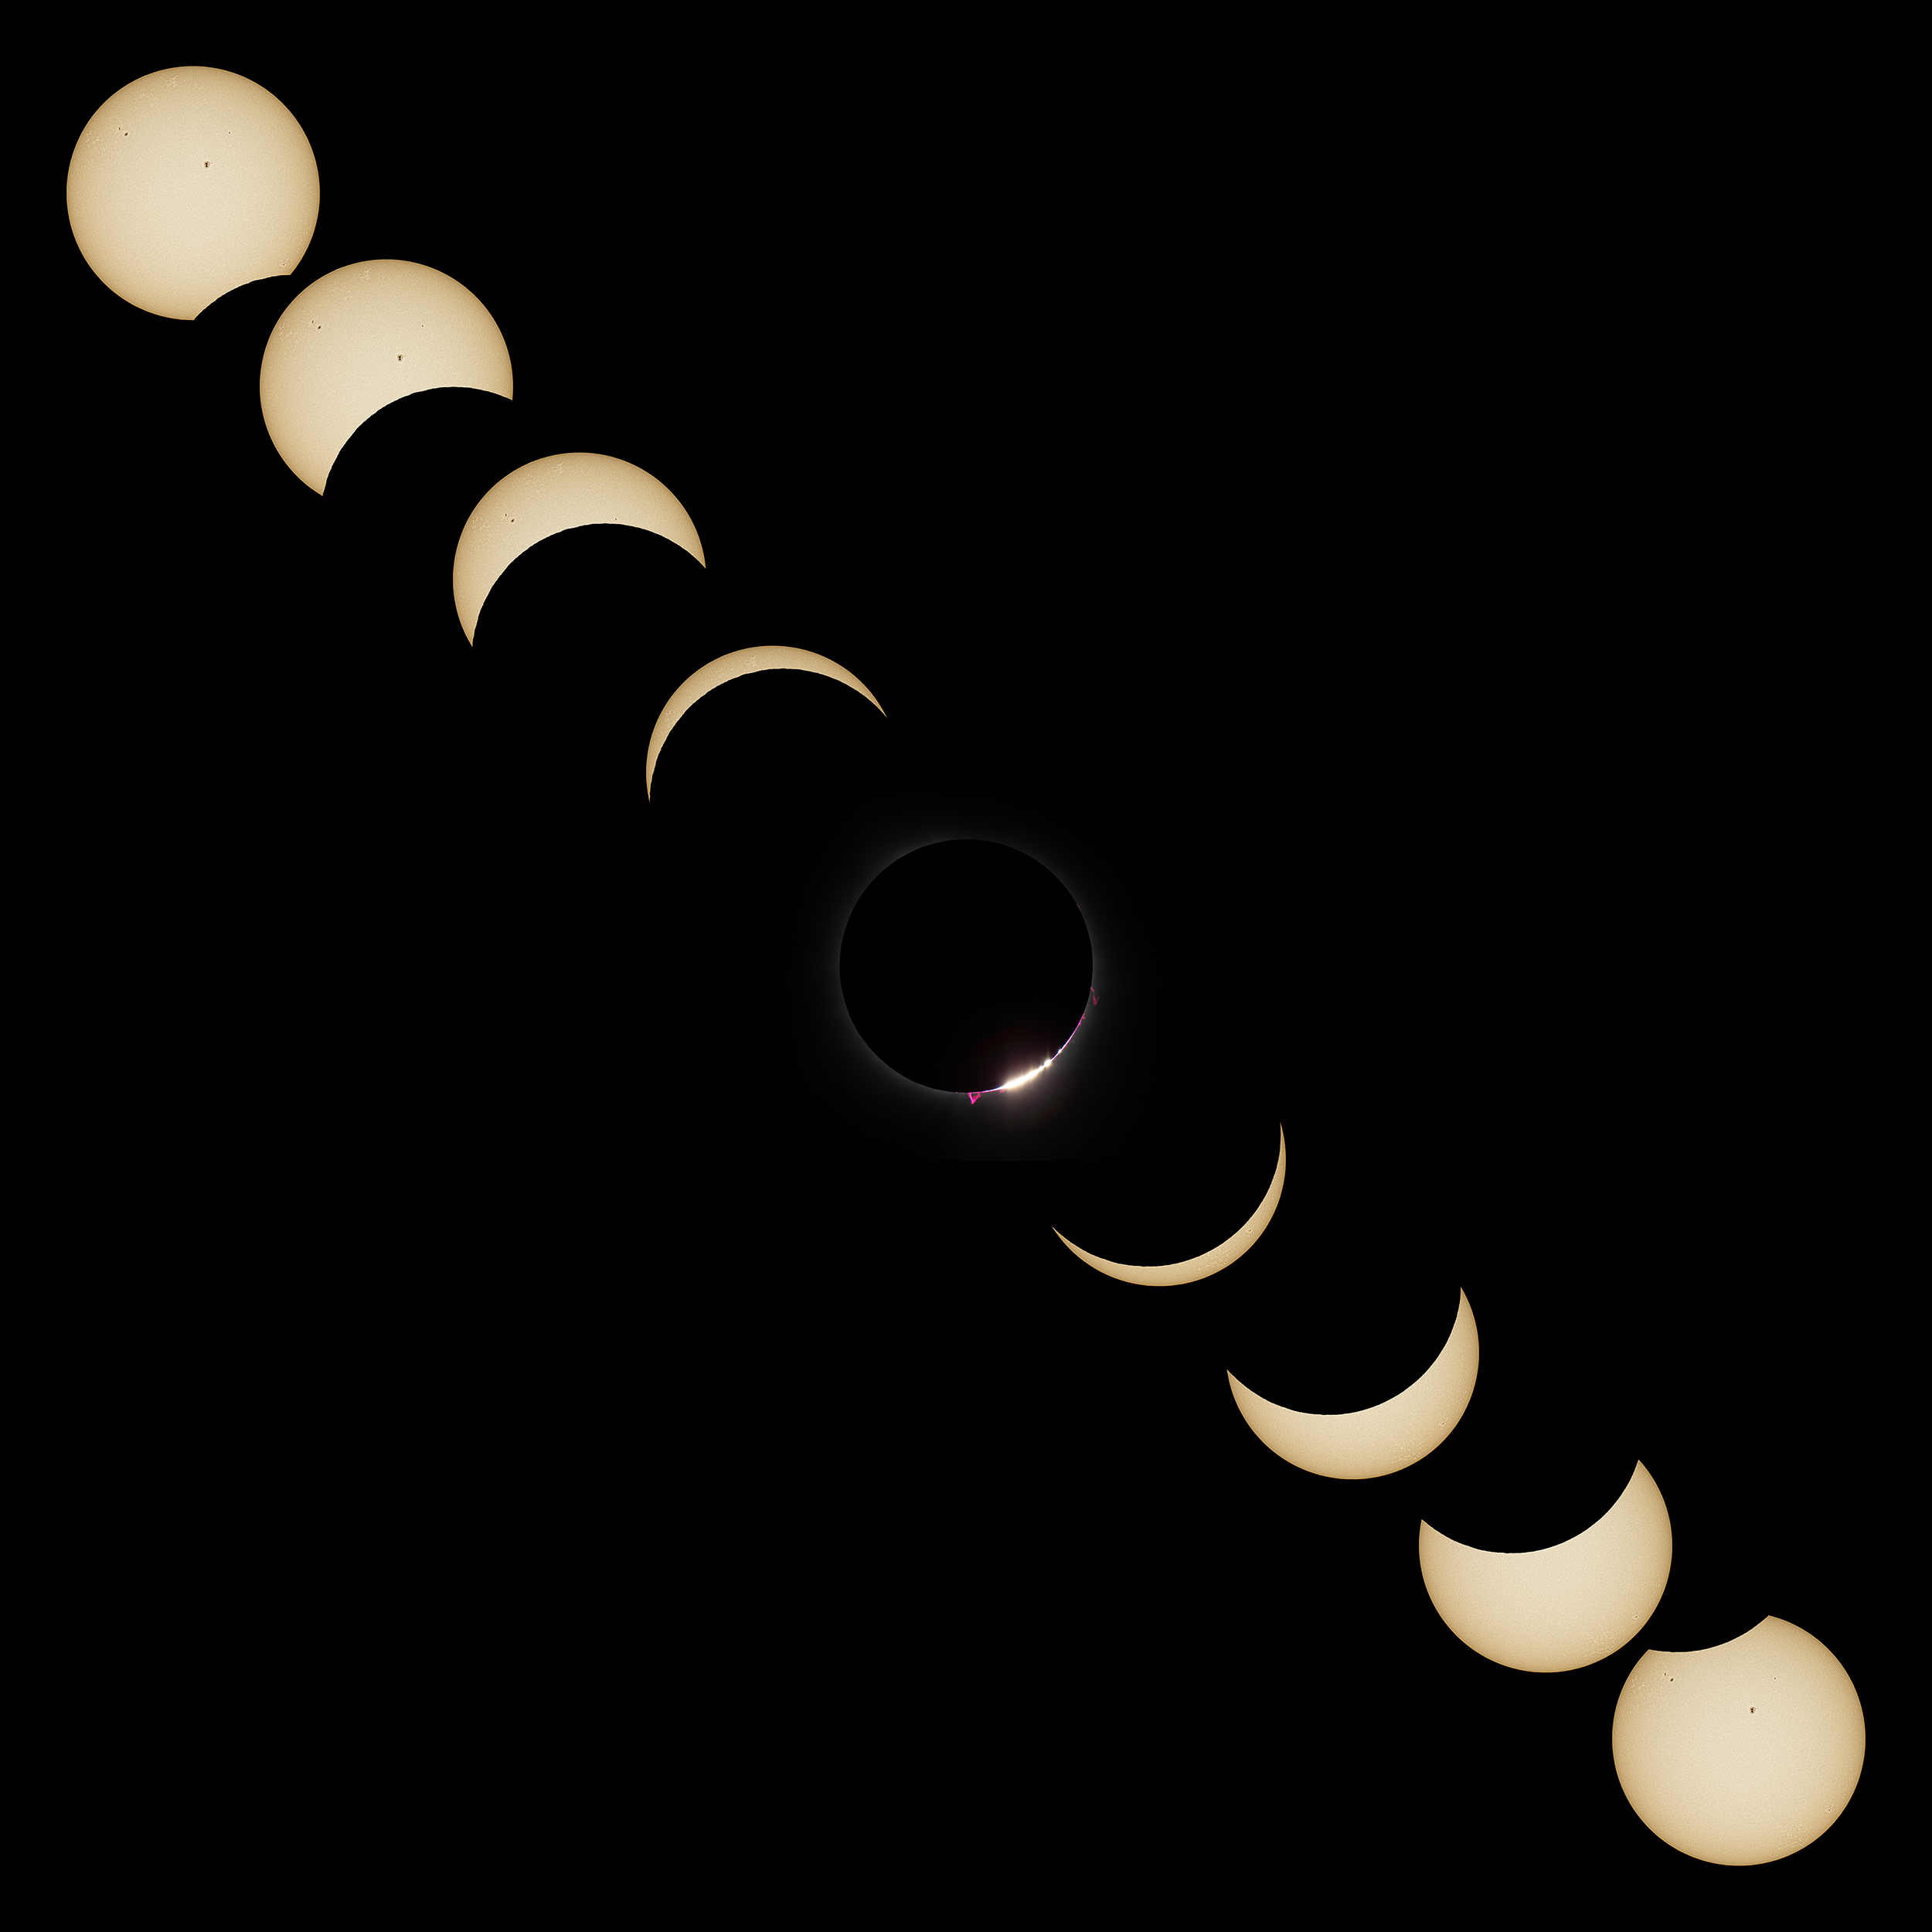
It is also the focal length range for perhaps the most iconic image of all: the diamond ring effect. This brilliant point of light appears at the very last and very first moments of totality, when a single bead of sunlight shines through a valley on the lunar limb, creating the impression of a sparkling ring set against the darkness.
Technique: Filters, Exposure Bracketing, Tracking – and Practice
Solar filters for partial phases. Before and after totality—and throughout the entire eclipse in Germany—a certified solar filter must be placed in front of the lens. Without it, the Sun is far too bright in the viewfinder, posing a serious risk of damage to both camera and eyes. Only during the moment of totality (and only there, in Spain) is the filter removed, because otherwise the corona would remain invisible.
Exposure bracketing for dynamic range. The corona and prominences cover an enormous brightness range—from the bright inner corona to the faint outer streamers, there are many stops of exposure difference. A single image cannot capture this. I therefore work with HDR exposure bracketing: seven shots spaced two stops apart. This allows me to cover everything from the diamond ring to the finest coronal structures and later combine the full dynamic range in post-processing. The key is to pre-configure and automate the sequence—there is no time to think during the roughly 105 seconds of totality.
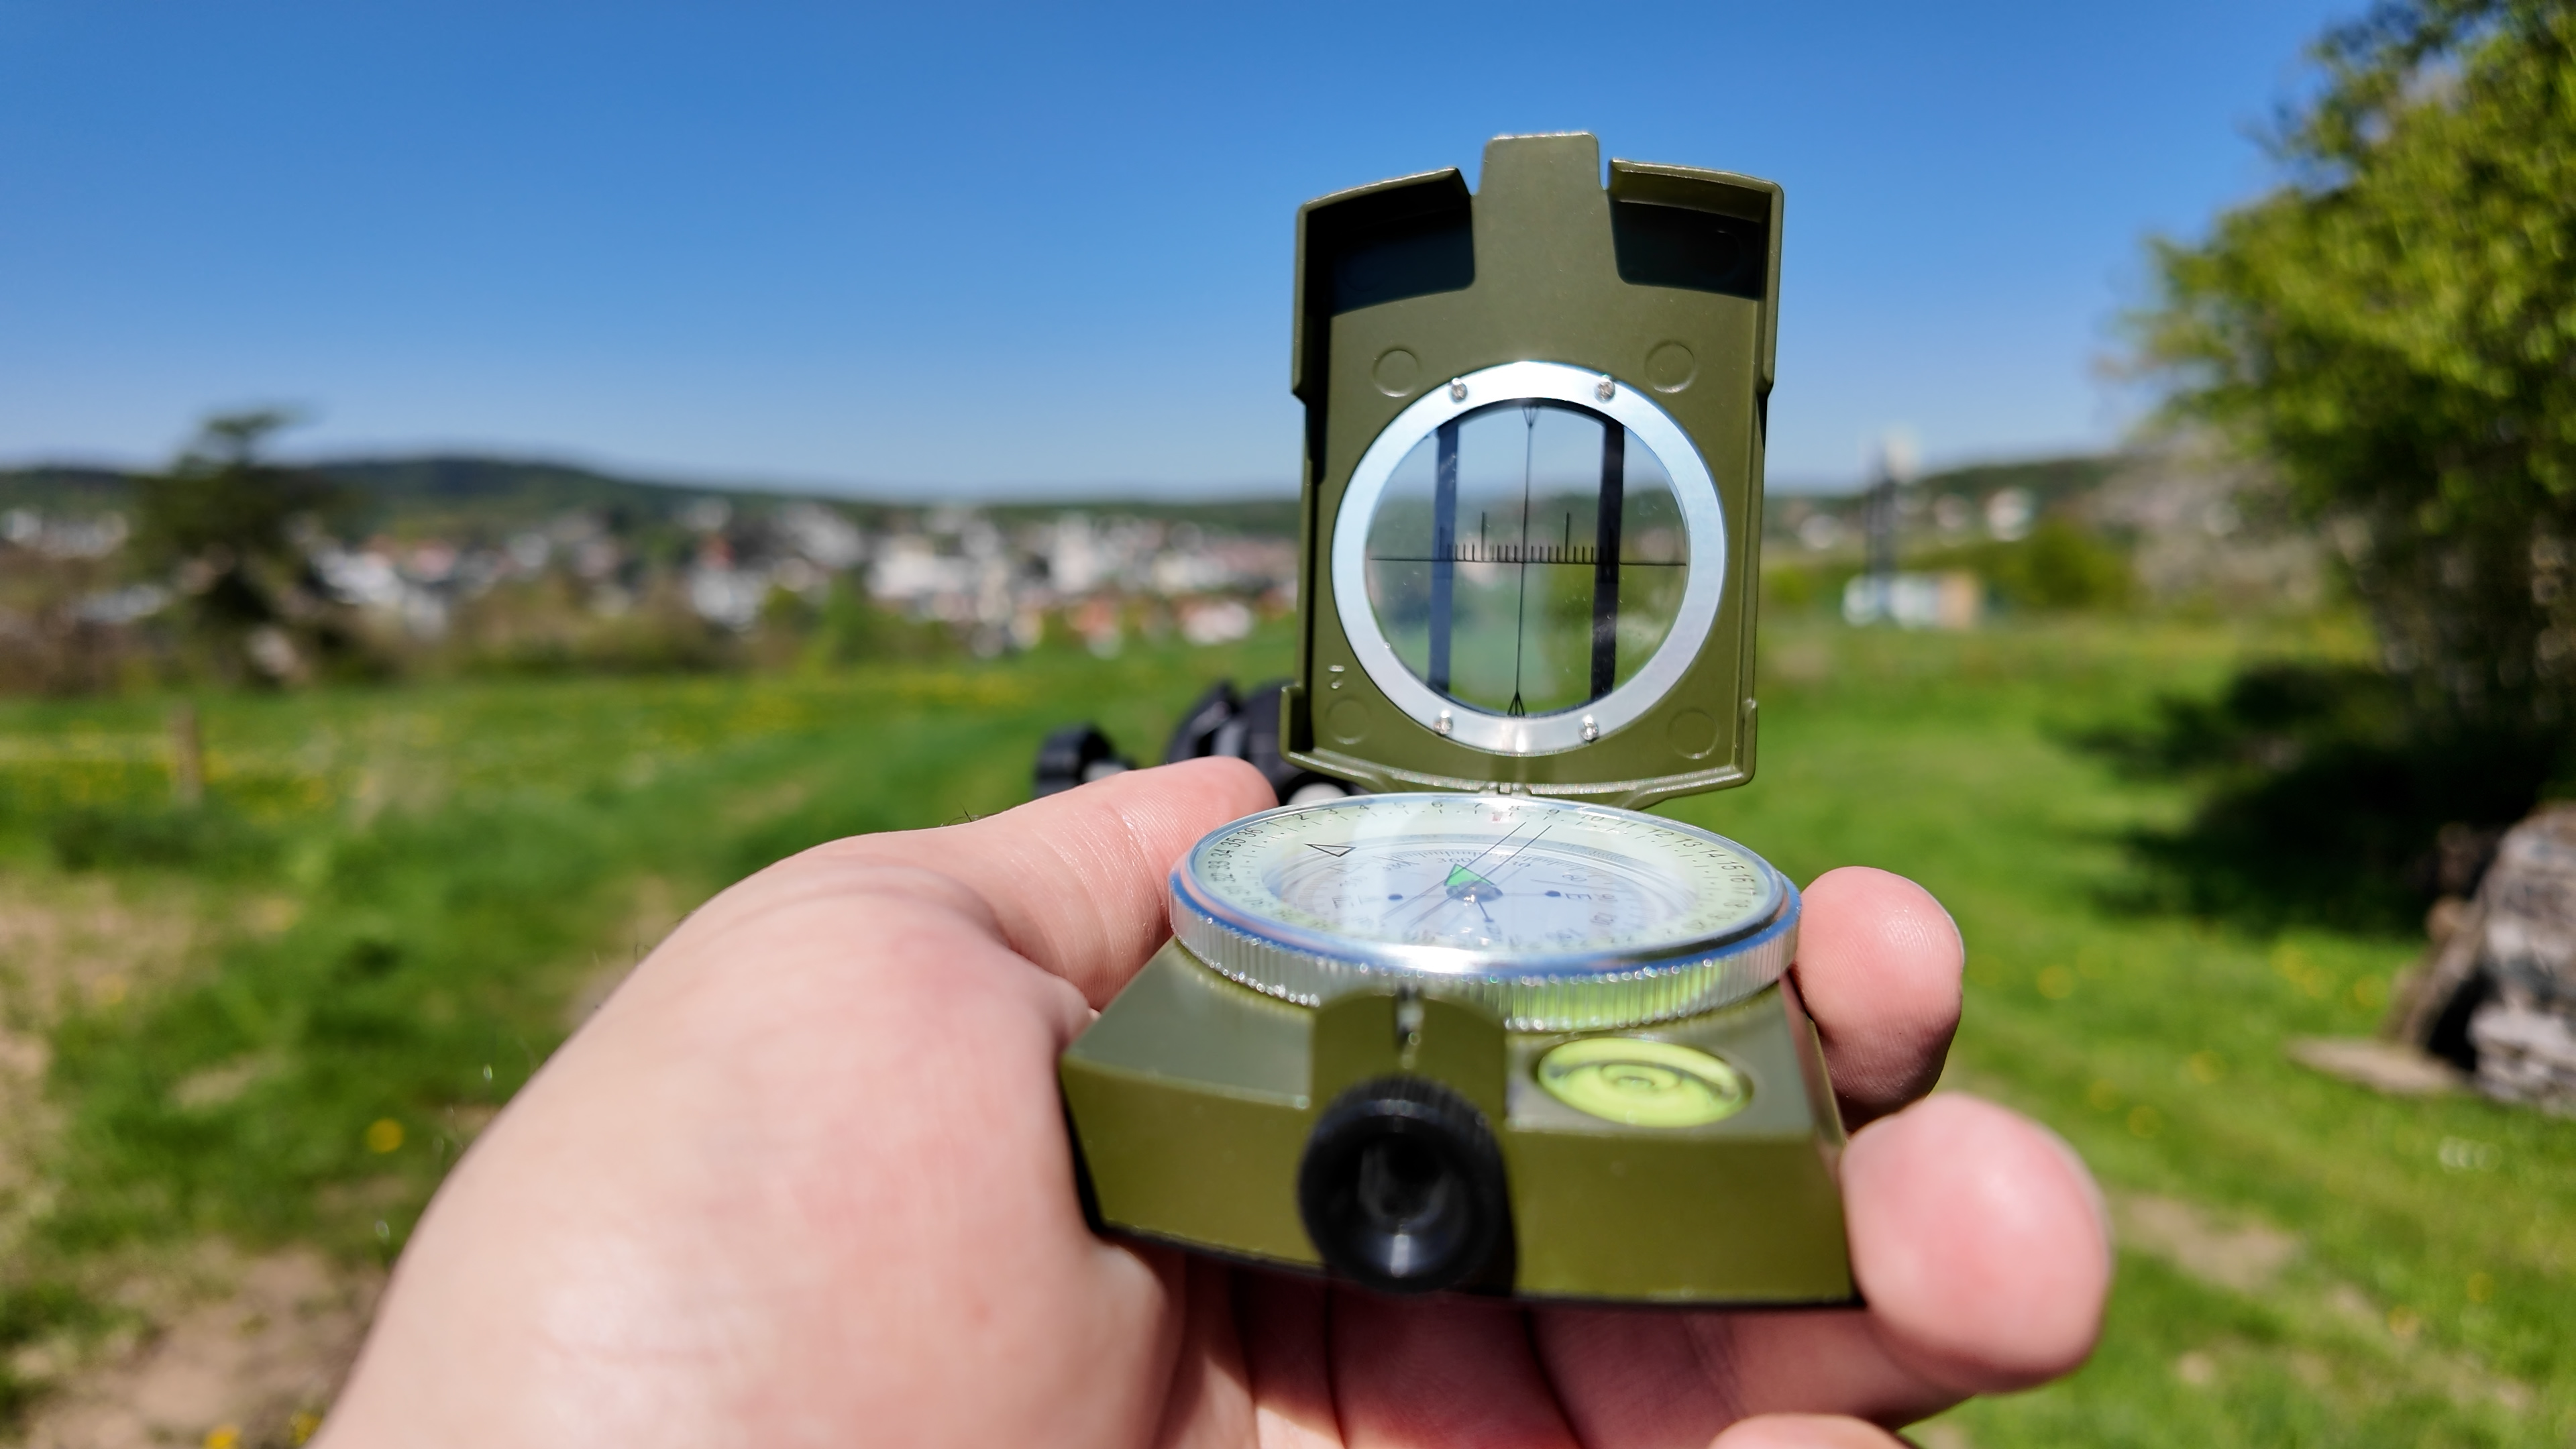
Tracking at long focal lengths. At 500 mm, the Sun moves through the frame surprisingly quickly. An astronomical tracking mount (travel mount / star tracker) keeps the Sun stable in the viewfinder and allows for relaxed triggering of exposure sequences. The challenge: during the day, you cannot see Polaris, which is normally used for alignment. A compass is therefore used to roughly align the tracker to north, which is entirely sufficient for the short duration of the eclipse.
Practice beforehand. My most important advice: rehearse the entire workflow before the real event. Photographing sunspots with a solar filter is ideal practice. It trains focusing on the Sun, setting up and aligning the tracking mount, shooting through the filter, and composing at long focal lengths—exactly the skills you will need under pressure on August 12.

Safety: The Most Important Point of All
As much as I love photography—this comes above everything else: during all partial phases, you must wear certified eclipse glasses (ISO 12312-2). Looking at even a partially visible Sun can cause permanent and painless damage to the retina; you usually only notice it once it is too late. This applies both to the naked eye and, in principle, to the camera, which requires its own solar filter.
Only during the brief moments of full totality—exclusively in Spain, when the Sun is completely covered—may you remove the glasses and observe the corona with the naked eye. The moment the first trace of sunlight reappears as the diamond ring, the glasses must go back on immediately.
In Germany, where no totality occurs, the glasses must remain on from beginning to end. No photograph in the world is worth your eyesight.
Final Thoughts
A solar eclipse rewards three things: thorough preparation, technical skill—and the humility to follow clear skies rather than your preferred location.
Plan your focal lengths, rehearse your technique, book early, set off early, and keep the option open—right up until the last hour on August 12—to move again if conditions demand it. With a bit of luck, you will find yourself exactly where the Moon meets the Sun and the sky is clear.
I’ll see you out there.

A propos de l'auteur : Bastian Werner
Der 1993 geborene Fotograf hat sein Leben unserem Wetter gewidmet – und damit die Wetterfotografie in Deutschland auf ein neues Niveau gehoben. Statt auf gut Glück an eine Location zu fahren, wartet er auf den Tag, an dem Wetter und Licht für ein Motiv perfekt sind. Sein umfangreiches Wissen gibt er in Workshops und Büchern weiter.
Produits TAMRON mentionnés dans cet article
150-500mm F/5-6.7 Di III VC VXD
Modèle A057
16-30mm F/2.8 Di III VXD G2
Modèle A064
70-180mm F/2.8 Di III VC VXD G2
Modèle A065
